If your SpotCam is already in use but you would like to move it to a new location, or if you need to change the Wi-Fi network your SpotCam is currently connected to, you will need to update the Wi-Fi settings on your SpotCam. Please note that you do not need to deactivate your SpotCam in order to change the Wi-Fi settings.
Updating the Wi-Fi settings on your SpotCam is just as simple as installing it. You only need to run the SpotCam setup process again using the SpotCam app on your mobile device or a web browser on your computer to connect your SpotCam to a new Wi-Fi network. Below are the SOP instructions for different SpotCam series models to help you update your SpotCam Wi-Fi settings.
Step 1: Switch the camera to AP mode
Please follow the instructions below based on your camera model to switch the camera from Client Mode to AP Mode.
1. Press and hold the Reset button on the back of the camera for 3 seconds to switch to AP Mode.
2. Confirm that the yellow LED indicator starts blinking.
Step 2: Change the camera’s Wi-Fi settings
You can log in using the SpotCam app on your mobile device or sign in to the SpotCam website through your web browser. Please make sure to log in with the same account you used when you first registered your SpotCam, then follow the on-screen instructions to update the Wi-Fi settings.
Using the mobile app
You can update the Wi-Fi settings using the mobile app. The process can be done on both Android and iOS smartphones or tablets. The following example uses a smartphone for demonstration.
1. After installing the app, open it and log in with the same account you used when you first set up your SpotCam. Once logged in, open the menu at the top right of the interface, where you will find the option to change the SpotCam Wi-Fi settings.
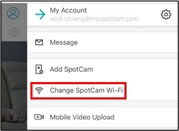
2. After tapping the change SpotCam Wi-Fi button, please select the model that matches your camera. You can confirm your camera model by checking the product label attached to the camera body.
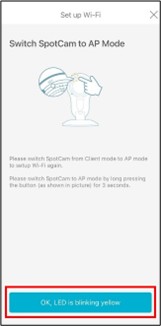
3. After selecting the model, a prompt will appear asking you to confirm whether the camera is already in AP mode. If the LED indicator is blinking yellow, tap
“OK, LED is blinking yellow.” ,If the LED is showing a different signal, please follow the instructions to switch the camera to AP mode.
4. Next, follow the on-screen instructions to allow your phone to connect to the SpotCam Wi-Fi. Then select the Wi-Fi network you want to switch to and enter the Wi-Fi password to update the SpotCam Wi-Fi settings.
Using a web browser
You can also change the Wi-Fi settings through a web browser. Being able to use the full SpotCam features through a browser is one of SpotCam’s unique advantages. The following example explains how to update the camera’s Wi-Fi settings using a web browser.
1. Open your web browser and go to the MySpotCam.com homepage. Then you will see the Add SpotCam button in the lower-left corner of the page.

2. After clicking the button, you will see the
Star from herebutton. Click it, and the system will prompt you to download a file. Please allow the download, and once it is complete, run the file. Don’t worry — no software will be installed on your computer.

3. Follow the prompts in the setup process and make sure to select the model that matches your camera, then click Next.
4. During the setup, you will see a message similar to the one shown below asking you to confirm whether the camera’s yellow LED indicator is blinking. If it is not, you can click
Click herein the message to switch the camera to AP mode, then follow the on-screen instructions to continue the setup.

5. Once you confirm the camera has entered AP mode, click Next as shown above. Then follow the on-screen instructions to switch your computer’s Wi-Fi connection to the camera’s AP mode network (SpotCam-XX). After connecting, select the Wi-Fi network you want the camera to use, enter the Wi-Fi password, and follow the remaining steps to complete the setup.

Step 1: Switch the camera to AP mode
Please follow the instructions below based on your camera model to switch the camera from Client Mode to AP Mode.
1. Turn off your SpotCam and switch the button on the back of the camera to AP Mode.
2. Connect the power to your SpotCam and wait until the yellow LED starts blinking.
Step 2: Change the camera’s Wi-Fi settings
You can log in using the SpotCam app on your mobile device, or sign in to the SpotCam website through a web browser. Please make sure to log in with the same account you used when you first registered your SpotCam, then follow the on-screen instructions to update the Wi-Fi settings.
Using the mobile app
You can update the Wi-Fi settings using the mobile app. The process can be done on both Android and iOS smartphones or tablets. The following example uses a smartphone for demonstration.
1. After installing the app, open it and log in with the same account you used when you first set up your SpotCam. Once logged in, open the menu at the top right of the interface, where you will find the option to change the SpotCam Wi-Fi settings.
2. Tap the Change SpotCam Wi-Fi button and select the model that matches your camera. You can confirm the model by checking the product label on the camera body.
3. After selecting the model, a prompt will appear asking you to confirm whether the camera is already in AP Mode. If the LED indicator is blinking yellow, tap
OK, LED is blinking yellow.,If the LED shows a different signal, please follow the instructions to switch the camera to AP Mode.

4. Next, follow the on-screen instructions to allow your phone to connect to the SpotCam Wi-Fi. Then select the Wi-Fi network you want to switch to and enter the Wi-Fi password to update the SpotCam Wi-Fi settings.
Using a web browser
You can also change the Wi-Fi settings through a web browser. Being able to use the full SpotCam features through a browser is one of SpotCam’s unique advantages. The following example explains how to update the camera’s Wi-Fi settings using a web browser.
1. 1. Open your web browser and go to the MySpotCam.com homepage. You will see the Add SpotCam button in the lower-left corner of the page.
2. After clicking the button, you will see the
Star from herebutton. Click it, and the system will prompt you to download a file. Please allow the download, and once it is complete, run the file. Don’t worry — no software will be installed on your computer.
3. Follow the prompts in the setup process and make sure to select the model that matches your camera, then click Next.
4. During the setup, you will see a message similar to the one shown below asking you to confirm whether the camera’s yellow LED indicator is blinking. If it is not, you can click
Click herein the message to switch the camera to AP mode, then follow the on-screen instructions to continue the setup.
5. Once you confirm the camera has entered AP mode, click Next as shown above. Then follow the on-screen instructions to switch your computer’s Wi-Fi connection to the camera’s AP mode network (SpotCam-XX). After connecting, select the Wi-Fi network you want the camera to use, enter the Wi-Fi password, and follow the remaining steps to complete the setup.
Step 1: Switch the camera to AP mode
Please follow the instructions below based on your camera model to switch the camera from Client Mode to AP Mode.
1. Press and hold the Reset button on the back of the camera for three seconds to switch to AP Mode.
2. Confirm that the yellow LED on the camera starts blinking.
Step 2: Change the camera’s Wi-Fi settings
You can log in using the SpotCam app on your mobile device or sign in to the SpotCam website through a web browser. Please make sure to log in with the same account you used when you first registered your SpotCam, then follow the on-screen instructions to update the Wi-Fi settings.
Using the mobile app
You can update the Wi-Fi settings using the mobile app. The process can be done on both Android and iOS smartphones or tablets. The following example uses a smartphone for demonstration.
1. After installing the app, open it and log in with the same account you used when you first set up your SpotCam. Once logged in, open the menu at the top right of the interface, where you will find the option to change the SpotCam Wi-Fi settings.
2. After tapping the change SpotCam Wi-Fi button, please select the model that matches your camera. You can confirm your camera model by checking the product label attached to the camera body.
3. After selecting the model, a prompt will appear asking you to confirm whether the camera is already in AP mode. If the LED indicator is blinking yellow, tap
OK, LED is blinking yellow.,If the LED is showing a different signal, please follow the instructions to switch the camera to AP mode.

4. Next, follow the on-screen instructions to allow your phone to connect to the SpotCam Wi-Fi. Then select the Wi-Fi network you want to switch to and enter the Wi-Fi password to update the SpotCam Wi-Fi settings.
Using a web browser
You can also change the Wi-Fi settings through a web browser. Being able to use the full SpotCam features through a browser is one of SpotCam’s unique advantages. The following example explains how to update the camera’s Wi-Fi settings using a web browser.
1. Open your web browser and go to the MySpotCam.com homepage. You will see the Add SpotCam button in the lower-left corner of the page.
2. After clicking the button, you will see the
Start from here button. Click it, and the system will prompt you to download a file. Please allow the download, and once it is complete, run the file. Don’t worry — no software will be installed on your computer.
3. Follow the prompts in the setup process and make sure to select the model that matches your camera, then click Next.
4. During the setup, you will see a message similar to the one shown below asking you to confirm whether the camera’s yellow LED indicator is blinking. If it is not, you can click
Click here in the message to switch the camera to AP mode, then follow the on-screen instructions to continue the setup.
5. Once you confirm the camera has entered AP mode, click Next as shown above. Then follow the on-screen instructions to switch your computer’s Wi-Fi connection to the camera’s AP mode network (SpotCam-XX). After connecting, select the Wi-Fi network you want the camera to use, enter the Wi-Fi password, and follow the remaining steps to complete the setup.
Step 1: Switch the camera to AP mode
Please follow the instructions below based on your camera model to switch the camera from Client Mode to AP Mode.
1. Press and hold the Reset button on the back of the camera for three seconds to switch to AP Mode.
2. Confirm that the yellow LED on the camera starts blinking.
Step 2: Change the camera’s Wi-Fi settings
You can log in using the SpotCam app on your mobile device or sign in to the SpotCam website through your web browser. Please make sure to log in with the same account you used when you first registered your SpotCam, then follow the on-screen instructions to update the Wi-Fi settings.
Using the mobile app
You can update the Wi-Fi settings using the mobile app. The process can be done on both Android and iOS smartphones or tablets. The following example uses a smartphone for demonstration.
1. After installing the app, open it and log in with the same account you used when you first set up your SpotCam. Once logged in, open the menu at the top right of the interface, where you will find the option to change the SpotCam Wi-Fi settings.
2. After tapping the change SpotCam Wi-Fi button, please select the model that matches your camera. You can confirm your camera model by checking the product label attached to the camera body.
3. After selecting the model, a prompt will appear asking you to confirm whether the camera is already in AP mode. If the LED indicator is blinking yellow, tap
OK, LED is blinking yellow. ,If the LED is showing a different signal, please follow the instructions to switch the camera to AP mode.

4. Next, follow the on-screen instructions to allow your phone to connect to the SpotCam Wi-Fi. Then select the Wi-Fi network you want to switch to and enter the Wi-Fi password to update the SpotCam Wi-Fi settings.
Using a web browser
You can also change the Wi-Fi settings through a web browser. Being able to use the full SpotCam features through a browser is one of SpotCam’s unique advantages. The following example explains how to update the camera’s Wi-Fi settings using a web browser.
1. 1. Open your web browser and go to the MySpotCam.com homepage. Then you will see the Install SpotCam button in the lower-left corner of the page.
2. After clicking the button, you will see the
“Start from here” button. Click it, and the system will prompt you to download a file. Please allow the download, and once it is complete, run the file. Don’t worry — no software will be installed on your computer.
3. Follow the prompts in the setup process and make sure to select the model that matches your camera, then click Next.
4. During the setup, you will see a message similar to the one shown below asking you to confirm whether the camera’s yellow LED indicator is blinking. If it is not, you can click
“Click here” in the message to switch the camera to AP mode, then follow the on-screen instructions to continue the setup.
5. Once you confirm the camera has entered AP mode, click Next as shown above. Then follow the on-screen instructions to switch your computer’s Wi-Fi connection to the camera’s AP mode network (SpotCam-XX). After connecting, select the Wi-Fi network you want the camera to use, enter the Wi-Fi password, and follow the remaining steps to complete the setup.
Step 1: Switch the camera to AP mode
Please follow the instructions below based on your camera model to switch the camera from Client Mode to AP Mode.
1. Step 2: Change the camera’s Wi-Fi settings
2. Confirm that the red LED on the camera starts blinking.
Step 2: Change the camera’s Wi-Fi settings
You can log in using the SpotCam app on your mobile device or sign in to the SpotCam website through your web browser. Please make sure to log in with the same account you used when you first registered your SpotCam, then follow the on-screen instructions
Using the mobile app
You can update the Wi-Fi settings using the mobile app. The process can be done on both Android and iOS smartphones or tablets. The following example uses a smartphone for demonstration.
1. After installing the app, open it and log in with the same account you used when you first set up your SpotCam. Once logged in, open the menu at the top right of the interface, where you will find the option to change the SpotCam Wi-Fi settings.
2. After tapping the change SpotCam Wi-Fi button, please select the model that matches your camera. You can confirm your camera model by checking the product label attached to the camera body.
3. After selecting the model, a prompt will appear asking you to confirm whether the camera is already in AP Mode. If the LED indicator is blinking red, tap
“OK, LED is blinking red.” ,If the LED shows a different signal, please follow the instructions to switch the camera to AP Mode.

4. Next, follow the on-screen instructions to allow your phone to connect to the SpotCam Wi-Fi. Then select the Wi-Fi network you want to switch to and enter the Wi-Fi password to update the SpotCam Wi-Fi settings.
Using a web browser
You can also change the Wi-Fi settings through a web browser. Being able to use the full SpotCam features through a browser is one of SpotCam’s unique advantages. The following example explains how to update the camera’s Wi-Fi settings using a web browser
1. Open your web browser and go to the MySpotCam.com homepage. Then you will see the Add SpotCam button in the lower-left corner of the page.
2. After clicking the button, you will see the
”Start here” button. Click it, and the system will prompt you to download a file. Please allow the download, and once it is complete, run the file. Don’t worry — no software will be installed on your compu
3. Follow the prompts in the setup process and make sure to select the model that matches your camera, then click Next.
4. During the setup, you will see a message similar to the one shown below asking you to confirm whether the camera’s red LED indicator is blinking. If it is not, you can click
”Click here” in the message to switch the camera to AP mode, then follow

5. Once you confirm the camera has entered AP mode, click Next as shown above. Then follow the on-screen instructions to switch your computer’s Wi-Fi connection to the camera’s AP mode network (SpotCam-XX). After connecting, select the Wi-Fi network you want the camera to use, enter the Wi-Fi password, and follow the remaining steps to complete the setup.
Step 1: Switch the camera to Bluetooth mode
Please follow the instructions below based on your camera model to switch the camera from Client Mode to Bluetooth Mode.
1. Press and hold the Reset button on the back of the camera for at least 15 seconds to switch to Bluetooth Mode.
2. Confirm that the red LED on the camera starts blinking.
Step 2: Change the camera’s Wi-Fi settings
You can log in using the SpotCam app on your mobile device or sign in to the SpotCam website through your web browser. Please make sure to log in with the same account you used when you first registered your SpotCam, then follow the on-screen instructions
Using the mobile app
You can update the Wi-Fi settings using the mobile app. The process can be done on both Android and iOS smartphones or tablets. The following example uses a smartphone for demonstration.
1. After installing the app, open it and log in with the same account you used when you first set up your SpotCam. Once logged in, open the menu at the top right of the interface, where you will find the option to change the SpotCam Wi-Fi settings.
2. After tapping the change SpotCam Wi-Fi button, please select the model that matches your camera. You can confirm your camera model by checking the product label attached to the camera body.
3. After selecting the model, a prompt will appear asking you to confirm whether the camera is already in Bluetooth Mode. If the LED indicator is blinking red, tap
OK, the LED is blinking red. If the LED shows a different signal, please follow the ins

4. Next, follow the on-screen instructions to allow your phone to connect to the SpotCam Wi-Fi. Then select the Wi-Fi network you want to switch to and enter the Wi-Fi password to update the SpotCam Wi-Fi settings.
Note: This model requires Bluetooth pairing for setup and installation. Therefore, the Wi-Fi settings cannot be changed using a computer browser. Please use a mobile device to perform this operation.
Step 1: Switch the camera to Bluetooth mode
Please follow the instructions below based on your camera model to switch the camera from Client Mode to Bluetooth Mode.
1. Press and hold the Reset button on the back of the camera for at least 15 seconds to switch to Bluetooth Mode.
2. Confirm that the yellow LED on the camera starts blinking.
Step 2: Change the camera’s Wi-Fi settings
You can log in using the SpotCam app on your mobile device or sign in to the SpotCam website through your web browser. Please make sure to log in with the same account you used when you first registered your SpotCam, then follow the on-screen instructions
Using the mobile app
You can update the Wi-Fi settings using the mobile app. The process can be done on both Android and iOS smartphones or tablets. The following example uses a smartphone for demonstration.
1. After installing the app, open it and log in with the same account you used when you first set up your SpotCam. Once logged in, open the menu at the top right of the interface, where you will find the option to change the SpotCam Wi-Fi settings.
2. After tapping the change SpotCam Wi-Fi button, please select the model that matches your camera. You can confirm your camera model by checking the product label attached to the camera body.
3. After selecting the model, a prompt will appear asking you to confirm whether the camera is already in Bluetooth Mode. If the LED indicator is blinking yellow, tap
OK, LED is blinking yellow. If the LED shows a different signal, please follow t

4. Next, follow the on-screen instructions to allow your phone to connect to the SpotCam Wi-Fi. Then select the Wi-Fi network you want to switch to and enter the Wi-Fi password to update the SpotCam Wi-Fi settings.
Note: This model requires Bluetooth pairing for setup and installation. Therefore, the Wi-Fi settings cannot be changed using a computer browser. Please use a mobile device to perform this operation.
Step 1: Switch the camera to AP mode
Please follow the instructions below based on your camera model to switch the camera from Client Mode to AP Mode.
1. Use a screwdriver to open the back cover of the camera, then press and hold the Reset button inside the cover for three seconds to switch to AP Mode.
2. Confirm that the camera emits a beeping sound.
Step 2: Change the camera’s Wi-Fi settings
You can log in using the SpotCam app on your mobile device or sign in to the SpotCam website through your web browser. Please make sure to log in with the same account you used when you first registered your SpotCam, then follow the on-screen instructions
Using the mobile app
You can update the Wi-Fi settings using the mobile app. The process can be done on both Android and iOS smartphones or tablets. The following example uses a smartphone for demonstration.
1. After installing the app, open it and log in with the same account you used when you first set up your SpotCam. Once logged in, open the menu at the top right of the interface, where you will find the option to change the SpotCam Wi-Fi settings.
2. After tapping the change SpotCam Wi-Fi button, please select the model that matches your camera. You can confirm your camera model by checking the product label attached to the camera body.
3. After selecting the model, a prompt will appear asking you to confirm whether the camera is already in AP Mode. If the camera is continuously beeping, tap
Continue Setup. If the camera is not continuously beeping, please follow the instructions to switch the camera to AP Mode.

4. Next, follow the on-screen instructions to allow your phone to connect to the SpotCam Wi-Fi. Then select the Wi-Fi network you want to switch to and enter the Wi-Fi password to update the SpotCam Wi-Fi settings.
Using a web browser
You can also change the Wi-Fi settings through a web browser. Being able to use the full SpotCam features through a browser is one of SpotCam’s unique advantages. The following example explains how to update the camera’s Wi-Fi settings using a web browser
1. Open your web browser and go to the MySpotCam.com homepage. Then you will see the Add SpotCam button in the lower-left corner of the page.
2. After clicking the button, you will see the
”Start here” button. Click it, and the system will prompt you to download a file. Please allow the download, and once it is complete, run the file. Don’t worry — no software will be installed on your compu
3. Follow the prompts in the setup process and make sure to select the model that matches your camera, then click Next.
4. During the setup process, you will see a message similar to the one shown below. Please confirm whether the camera is emitting a beeping sound. If not, click
Click here in the message and follow the instructions shown to switch the camera to AP Mod

5. Once you confirm the camera has entered AP mode, click Next as shown above. Then follow the on-screen instructions to switch your computer’s Wi-Fi connection to the camera’s AP mode network (SpotCam-XX). After connecting, select the Wi-Fi network you want the camera to use, enter the Wi-Fi password, and follow the remaining steps to complete the setup.
Step 1: Switch the camera to AP mode
Please follow the instructions below based on your camera model to switch the camera from Client Mode to AP Mode.
1. Press and hold the Reset button on the back of the camera for three seconds to switch to AP Mode.
2. Confirm that the yellow LED on the camera starts blinking.
Step 2: Change the camera’s Wi-Fi settings
You can log in using the SpotCam app on your mobile device or sign in to the SpotCam website through your web browser. Please make sure to log in with the same account you used when you first registered your SpotCam, then follow the on-screen instructions
Using the mobile app
You can update the Wi-Fi settings using the mobile app. The process can be done on both Android and iOS smartphones or tablets. The following example uses a smartphone for demonstration.
1. After installing the app, open it and log in with the same account you used when you first set up your SpotCam. Once logged in, open the menu at the top right of the interface, where you will find the option to change the SpotCam Wi-Fi settings.
2. After tapping the change SpotCam Wi-Fi button, please select the model that matches your camera. You can confirm your camera model by checking the product label attached to the camera body.
3. After selecting the model, a prompt will appear asking you to confirm whether the camera is already in AP mode. If the LED indicator is blinking yellow, tap “OK, the LED is blinking yellow.” If the LED is showing a different signal, please follow the inst

4. Next, follow the on-screen instructions to allow your phone to connect to the SpotCam Wi-Fi. Then select the Wi-Fi network you want to switch to and enter the Wi-Fi password to update the SpotCam Wi-Fi settings.
Using a web browser
You can also change the Wi-Fi settings through a web browser. Being able to use the full SpotCam features through a browser is one of SpotCam’s unique advantages. The following example explains how to update the camera’s Wi-Fi settings using a web browser
1. Open your web browser and go to the MySpotCam.com homepage. Then you will see the Add SpotCam button in the lower-left corner of the page.
2. After clicking the button, you will see the
”Start here” button. Click it, and the system will prompt you to download a file. Please allow the download, and once it is complete, run the file. Don’t worry — no software will be installed on your compu
3. Follow the prompts in the setup process and make sure to select the model that matches your camera, then click Next.
4. During the setup, you will see a message similar to the one shown below asking you to confirm whether the camera’s yellow LED indicator is blinking. If it is not, you can click “Click here” in the message to switch the camera to AP mode, then follow the o
5. Once you confirm the camera has entered AP mode, click Next as shown above. Then follow the on-screen instructions to switch your computer’s Wi-Fi connection to the camera’s AP mode network (SpotCam-XX). After connecting, select the Wi-Fi network you want the camera to use, enter the Wi-Fi password, and follow the remaining steps to complete the setup.
Step 1: Switch the camera to AP mode
Please follow the instructions below based on your camera model to switch the camera from Client Mode to AP Mode.
1. Use the included hex key to open the camera housing, then press and hold the Reset button inside the camera for three seconds to switch the camera to AP Mode.
2. Confirm that the camera emits a beeping sound.
Step 2: Change the camera’s Wi-Fi settings
You can log in using the SpotCam app on your mobile device or sign in to the SpotCam website through your web browser. Please make sure to log in with the same account you used when you first registered your SpotCam, then follow the on-screen instructions
Using the mobile app
You can update the Wi-Fi settings using the mobile app. The process can be done on both Android and iOS smartphones or tablets. The following example uses a smartphone for demonstration.
1. After installing the app, open it and log in with the same account you used when you first set up your SpotCam. Once logged in, open the menu at the top right of the interface, where you will find the option to change the SpotCam Wi-Fi settings.
2. After tapping the change SpotCam Wi-Fi button, please select the model that matches your camera. You can confirm your camera model by checking the product label attached to the camera body.
3. After selecting the model, a prompt will appear asking you to confirm whether the camera is already in AP Mode. If the camera is continuously beeping, tap
Continue Setup. If the camera is not continuously beeping, please follow the instructions to

4. Next, follow the on-screen instructions to allow your phone to connect to the SpotCam Wi-Fi. Then select the Wi-Fi network you want to switch to and enter the Wi-Fi password to update the SpotCam Wi-Fi settings.
Using a web browser
You can also change the Wi-Fi settings through a web browser. Being able to use the full SpotCam features through a browser is one of SpotCam’s unique advantages. The following example explains how to update the camera’s Wi-Fi settings using a web browser
1. Open your web browser and go to the MySpotCam.com homepage. You will see the Add SpotCam button in the lower-left corner of the page.
2. After clicking the button, you will see the
”Start here” button. Click it, and the system will prompt you to download a file. Please allow the download, and once it is complete, run the file. Don’t worry — no software will be installed on your compu
3. Follow the prompts in the setup process and make sure to select the model that matches your camera, then click Next.
4. During the setup process, you will see a message similar to the one shown below. Please confirm whether the camera is emitting a beeping sound. If not, click
Click here in the message and follow the instructions shown to switch the camera to AP Mod
5. Once you confirm the camera has entered AP mode, click Next as shown above. Then follow the on-screen instructions to switch your computer’s Wi-Fi connection to the camera’s AP mode network (SpotCam-XX). After connecting, select the Wi-Fi network you want the camera to use, enter the Wi-Fi password, and follow the remaining steps to complete the setup.
Step 1: Switch the camera to AP mode
Please follow the instructions below based on your camera model to switch the camera from Client Mode to AP Mode.
1. Open the rubber cover on the bottom of the camera, then press and hold the Reset button inside the cover for three seconds to switch to AP Mode.
2. Confirm that the camera emits a beeping sound.
Step 2: Change the camera’s Wi-Fi settings
You can log in using the SpotCam app on your mobile device or sign in to the SpotCam website through your web browser. Please make sure to log in with the same account you used when you first registered your SpotCam, then follow the on-screen instructions
Using the mobile app
You can update the Wi-Fi settings using the mobile app. The process can be done on both Android and iOS smartphones or tablets. The following example uses a smartphone for demonstration.
1. After installing the app, open it and log in with the same account you used when you first set up your SpotCam. Once logged in, open the menu at the top right of the interface, where you will find the option to change the SpotCam Wi-Fi settings.
2. After tapping the change SpotCam Wi-Fi button, please select the model that matches your camera. You can confirm your camera model by checking the product label attached to the camera body.
3. After selecting the model, a prompt will appear asking you to confirm whether the camera is already in AP Mode. If the camera is continuously beeping, tap
Continue Setup. If the camera is not continuously beeping, please follow the instructions to

4. Next, follow the on-screen instructions to allow your phone to connect to the SpotCam Wi-Fi. Then select the Wi-Fi network you want to switch to and enter the Wi-Fi password to update the SpotCam Wi-Fi settings.
Using a web browser
You can also change the Wi-Fi settings through a web browser. Being able to use the full SpotCam features through a browser is one of SpotCam’s unique advantages. The following example explains how to update the camera’s Wi-Fi settings using a web browser
1. Open your web browser and go to the MySpotCam.com homepage. You will see the Add SpotCam button in the lower-left corner of the page.
2. After clicking the button, you will see the
”Start here” button. Click it, and the system will prompt you to download a file. Please allow the download, and once it is complete, run the file. Don’t worry — no software will be installed on your compu
3. Follow the prompts in the setup process and make sure to select the model that matches your camera, then click Next.
4. During the setup process, you will see a message similar to the one shown below. Please confirm whether the camera is emitting a beeping sound. If not, click
Click here in the message and follow the instructions shown to switch the camera to AP Mod
5. Once you confirm the camera has entered AP mode, click Next as shown above. Then follow the on-screen instructions to switch your computer’s Wi-Fi connection to the camera’s AP mode network (SpotCam-XX). After connecting, select the Wi-Fi network you want the camera to use, enter the Wi-Fi password, and follow the remaining steps to complete the setup.
Step 1: Switch the camera to AP mode
Please follow the instructions below based on your camera model to switch the camera from Client Mode to AP Mode.
1. Open the cover on the bottom of the camera and press and hold the Reset button inside the cover for three seconds to switch to AP Mode.
2. Confirm that the camera emits a beeping sound.
Step 2: Change the camera’s Wi-Fi settings
You can log in using the SpotCam app on your mobile device or sign in to the SpotCam website through your web browser. Please make sure to log in with the same account you used when you first registered your SpotCam, then follow the on-screen instructions
Using the mobile app
You can update the Wi-Fi settings using the mobile app. The process can be done on both Android and iOS smartphones or tablets. The following example uses a smartphone for demonstration.
1. After installing the app, open it and log in with the same account you used when you first set up your SpotCam. Once logged in, open the menu at the top right of the interface, where you will find the option to change the SpotCam Wi-Fi settings.
2. After tapping the change SpotCam Wi-Fi button, please select the model that matches your camera. You can confirm your camera model by checking the product label attached to the camera body.
3. After selecting the model, a prompt will appear asking you to confirm whether the camera is already in AP Mode. If the camera is continuously beeping, tap
Continue Setup. If the camera is not continuously beeping, please follow the instructions to

4. Next, follow the on-screen instructions to allow your phone to connect to the SpotCam Wi-Fi. Then select the Wi-Fi network you want to switch to and enter the Wi-Fi password to update the SpotCam Wi-Fi settings.
Using a web browser
You can also change the Wi-Fi settings through a web browser. Being able to use the full SpotCam features through a browser is one of SpotCam’s unique advantages. The following example explains how to update the camera’s Wi-Fi settings using a web browser
1. Open your web browser and go to the MySpotCam.com homepage. You will see the Add SpotCam button in the lower-left corner of the page.
2. After clicking the button, you will see the
”Start here” button. Click it, and the system will prompt you to download a file. Please allow the download, and once it is complete, run the file. Don’t worry — no software will be installed on your compu
3. Follow the prompts in the setup process and make sure to select the model that matches your camera, then click Next.
4. During the setup process, you will see a message similar to the one shown below. Please confirm whether the camera is emitting a beeping sound. If not, click
Click here in the message and follow the instructions shown to switch the camera to AP Mod
5. Once you confirm the camera has entered AP mode, click Next as shown above. Then follow the on-screen instructions to switch your computer’s Wi-Fi connection to the camera’s AP mode network (SpotCam-XX). After connecting, select the Wi-Fi network you want the camera to use, enter the Wi-Fi password, and follow the remaining steps to complete the setup.
Step 1: Switch the camera to AP mode
Please follow the instructions below based on your camera model to switch the camera from Client Mode to AP Mode.
1. Press and hold the Reset button on the back of the camera for three seconds to switch to AP Mode.
2. Confirm that the yellow LED on the camera starts blinking.
Step 2: Change the camera’s Wi-Fi settings
You can log in using the SpotCam app on your mobile device or sign in to the SpotCam website through your web browser. Please make sure to log in with the same account you used when you first registered your SpotCam, then follow the on-screen instructions
Using the mobile app
You can update the Wi-Fi settings using the mobile app. The process can be done on both Android and iOS smartphones or tablets. The following example uses a smartphone for demonstration.
1. After installing the app, open it and log in with the same account you used when you first set up your SpotCam. Once logged in, open the menu at the top right of the interface, where you will find the option to change the SpotCam Wi-Fi settings.
2. After tapping the change SpotCam Wi-Fi button, please select the model that matches your camera. You can confirm your camera model by checking the product label attached to the camera body.
3. After selecting the model, a prompt will appear asking you to confirm whether the camera is already in AP mode. If the LED indicator is blinking yellow, tap “OK, the LED is blinking yellow.” If the LED is showing a different signal, please follow the inst

4. Next, follow the on-screen instructions to allow your phone to connect to the SpotCam Wi-Fi. Then select the Wi-Fi network you want to switch to and enter the Wi-Fi password to update the SpotCam Wi-Fi settings.
Using a web browser
You can also change the Wi-Fi settings through a web browser. Being able to use the full SpotCam features through a browser is one of SpotCam’s unique advantages. The following example explains how to update the camera’s Wi-Fi settings using a web browser
1. Open your web browser and go to the MySpotCam.com homepage. You will see the Add SpotCam button in the lower-left corner of the page.
2. After clicking the button, you will see the
”Start here” button. Click it, and the system will prompt you to download a file. Please allow the download, and once it is complete, run the file. Don’t worry — no software will be installed on your compu
3. Follow the prompts in the setup process and make sure to select the model that matches your camera, then click Next.
4. During the setup, you will see a message similar to the one shown below asking you to confirm whether the camera’s yellow LED indicator is blinking. If it is not, you can click “Click here” in the message to switch the camera to AP mode, then follow the o
5. Once you confirm the camera has entered AP mode, click Next as shown above. Then follow the on-screen instructions to switch your computer’s Wi-Fi connection to the camera’s AP mode network (SpotCam-XX). After connecting, select the Wi-Fi network you want the camera to use, enter the Wi-Fi password, and follow the remaining steps to complete the setup.
Step 1: Switch the camera to Bluetooth mode
Please follow the instructions below based on your camera model to switch the camera from Client Mode to Bluetooth Mode.
1. Press and hold the Reset button on the back of the camera for at least 15 seconds to switch to Bluetooth Mode.
2. Confirm that the yellow LED on the camera starts blinking.
Step 2: Change the camera’s Wi-Fi settings
You can log in using the SpotCam app on your mobile device or sign in to the SpotCam website through your web browser. Please make sure to log in with the same account you used when you first registered your SpotCam, then follow the on-screen instructions
Using the mobile app
You can update the Wi-Fi settings using the mobile app. The process can be done on both Android and iOS smartphones or tablets. The following example uses a smartphone for demonstration.
1. After installing the app, open it and log in with the same account you used when you first set up your SpotCam. Once logged in, open the menu at the top right of the interface, where you will find the option to change the SpotCam Wi-Fi settings.
2. After tapping the change SpotCam Wi-Fi button, please select the model that matches your camera. You can confirm your camera model by checking the product label attached to the camera body.
3. After selecting the model, a prompt will appear asking you to confirm whether the camera is already in Bluetooth Mode. If the LED indicator is blinking yellow, tap
OK, LED is blinking yellow. If the LED shows a different signal, please follow t

4. Next, follow the on-screen instructions to allow your phone to connect to the SpotCam Wi-Fi. Then select the Wi-Fi network you want to switch to and enter the Wi-Fi password to update the SpotCam Wi-Fi settings.
Note: This model requires Bluetooth pairing for setup and installation. Therefore, the Wi-Fi settings cannot be changed using a computer browser. Please use a mobile device to perform this operation.
Step 1: Switch the camera to Bluetooth mode
Please follow the instructions below based on your camera model to switch the camera from Client Mode to Bluetooth Mode.
1. Press and hold the Reset button on the back of the camera for at least 15 seconds to switch to Bluetooth Mode.
2. Confirm that the yellow LED on the camera starts blinking.
Step 2: Change the camera’s Wi-Fi settings
You can log in using the SpotCam app on your mobile device or sign in to the SpotCam website through your web browser. Please make sure to log in with the same account you used when you first registered your SpotCam, then follow the on-screen instructions
Using the mobile app
You can update the Wi-Fi settings using the mobile app. The process can be done on both Android and iOS smartphones or tablets. The following example uses a smartphone for demonstration.
1. After installing the app, open it and log in with the same account you used when you first set up your SpotCam. Once logged in, open the menu at the top right of the interface, where you will find the option to change the SpotCam Wi-Fi settings.
2. 按下變更SpotCam Wi-Fi的按鈕後,請依照安裝流程中的提示進行設定,並確認選擇符合您攝影機的型號。
3. After selecting the model, a prompt will appear asking you to confirm whether the camera is already in Bluetooth Mode. If the LED indicator is blinking yellow, tap
OK, LED is blinking yellow. If the LED shows a different signal, please follow t

4. Next, follow the on-screen instructions to allow your phone to connect to the SpotCam Wi-Fi. Then select the Wi-Fi network you want to switch to and enter the Wi-Fi password to update the SpotCam Wi-Fi settings.
Note: This model requires Bluetooth pairing for setup and installation. Therefore, the Wi-Fi settings cannot be changed using a computer browser. Please use a mobile device to perform this operation.


 English
 English (UK)
 日本語
日本語 繁中 (台灣)
 繁中 (香港)
 Deutsch
 Français